Here at DIDWW, we strive to ensure the best user experience for our customers. This commitment requires continuous enhancements to our self-service User Panel, and we are very excited to share the news about the launch of two highly requested account management features - Roles and Multi Accounts.
The Roles functionality allows the account owner to invite users to his/her account by assigning a certain role or roles to the invited user. There will be 5 role types available, and a single user may be assigned several roles. A new user can be invited by selecting the “Account Settings” section on the left side menu of DIDWW User Panel, clicking on the “Users” tab and then the “+Invite User” button.

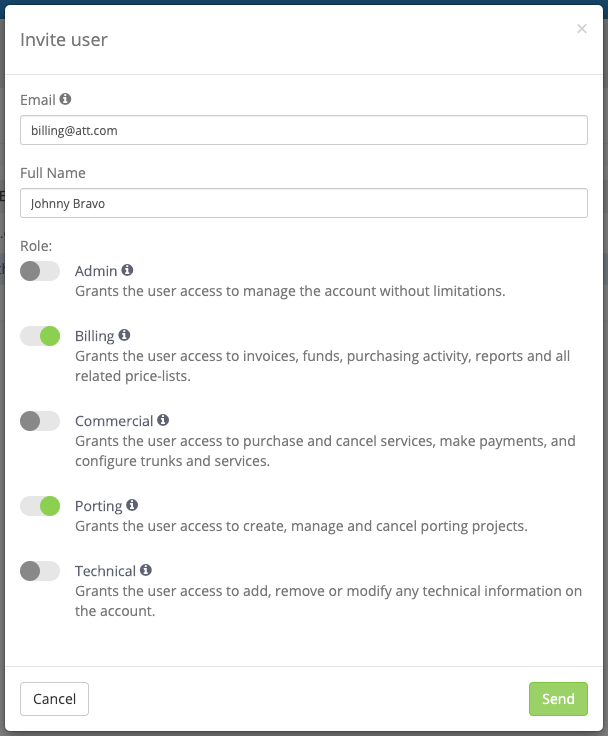
A pop-up window appears, where the new user’s email and name should be entered and the required role(s) selected.

Below is a list of available roles, together with their access rights and limitations:
Admin Role
Grants the user access to manage the account without limitations.
Permitted access:
a) Full access to manage the account.
Prohibited access:
a) Removing the account owner.
Commercial Role
Grants the user access to purchase and cancel services, make payments, and configure trunks and services.
Permitted access:
a) Buying and canceling any services.
b) Managing account payments.
c) Creating and canceling porting projects.
d) Creating, removing and editing trunks and all technical information.
e) Configuring the account services.
f) Examining SMS and call logs.
g) Accessing the account’s cloud phone systems and softphone settings.
h) Editing the general account settings.
Prohibited access:
a) Accessing API information.
b) Creating and managing the account’s roles and permissions.
Billing Role
Grants the user access to invoices, funds, purchasing activity, reports and all related pricelists.
Permitted access:
a) Managing the account’s funds (payment methods).
b) Downloading invoices.
c) Viewing reports.
d) Viewing the purchasing activity on the account.
e) Examining pricelists, SMS and call logs.
f) Viewing existing numbers.
g) Managing existing porting projects.
Prohibited access:
a) Buying or removing any services including numbers, trunks, porting projects, etc.
b) Adding, removing or modifying trunk information or any technical configurations.
c) Accessing API information.
Technical Role
Grants the user access to add, remove or modify any technical information on the account.
Permitted access:
a) Full management of the account’s technical configuration.
b) Configuration of number and capacity groups.
c) Creating, editing and removing trunks.
d) Examining SMS and call logs.
e) Accessing API information.
f) Accessing the account’s cloud phone systems and softphone settings.
g) Managing the general account settings.
Prohibited access:
a) Buying and canceling any services.
b) Managing the account payments.
c) Examining the account invoices and price lists.
d) Managing number porting.
e) Viewing the purchasing activity on the account.
Porting Role
Grants the user access to create, manage and cancel porting projects.
Permitted access:
a) Creating and managing all porting projects.
b) Setting of the account’s Configuration Profiles.
c) Configuration of existing numbers and capacity.
d) Managing general account settings.
e) Examining pricelists.
Prohibited access:
a) Buying and canceling any services.
b) Managing account payments.
c) Viewing account invoices.
d) Removing any existing technical configurations.
e) Accessing the account’s cloud phone systems and softphone settings.
f) Examining SMS and call logs.
g) Accessing API information.
The invited user receives an email with a link to the DIDWW account. To access this account, the user may login with his/her personal DIDWW account details (if he/she already has a DIDWW account) or create a new personal DIDWW account.
The new Multi Account feature allows any user to create and switch between multiple accounts on the DIDWW User Panel under a single login.
A new DIDWW account may be created by selecting the “Account Settings” section on the left side menu of DIDWW User Panel, clicking on the “Accounts” tab, and then the “+Create a new account” button. A window for entering the account details appears.

Users are able to switch between accounts under the “Accounts” tab by clicking on the “Login” button in the “Actions” section, or by opening the drop-down list on the left side menu where the User and Account name is displayed.

If you have any questions regarding the new features, please do not hesitate to contact us at customer.care@didww.com or via our live chat at anytime.